Playback Method — Program
Program
Program provides an easy method for users to include a template, several zones and configurations into one package. Each template can be created as one independent package with its own configurations. Similar to the Skin playback method, Program allows you to divide the screen into several zones and each zone will apply its own multimedia settings. However, all zones within one program will only apply one schedule.
Create a New Program
- Click New to create a Program.
- Select a Skin. SMP players have some built-in templates which are displayed at the bottom of the page. You can create new Skins or download more templates from Online Resources in LIBRARY > Skin page.
-
After you select a Skin, enter its Program Name and Description.
- Finish settings of each zone. You can see the bigger image of the skin in the middle. Please click the icon or click each zone directly to configure settings of each zone. You can only configure those zones which are already included in your selected Skin.
- Click Save to complete creating this Program. You can also click Save and play to create a program and play it at the same time.
We will introduce detailed configurations of each zone as follows.
Video Zone 
If there are two Video zones on your selected skin, you have to configure settings for both two zones: Video-1 and Video-2.
Media Files
You can choose to play video files in this SMP's Media Folder.
- Click Edit Playlist, and you can select those video files you want to play. All video files in the Media Folder will be listed in the left column. You can click the refresh button
 to make sure the system gets the most updated data. If the left column is empty, that means there is no file in the Media Folder. Please add video files to Media Folder first.
 - Select those files you want to play. You can select multiple files at one time by holding the Shift or Ctrl key, or just select files one by one. You can also choose a folder and play all files in that folder. If you want to search any specific file, enter the keyword after the search icon
 . Then all possible files and folders will show up.
 - Click
 , and all selected files in the left column will be duplicated to the right column. SMP will only play those files in the right column.
 - Now, you can arrange the order of those selected files. In the right column, SMP will play files from top to bottom. Please refer to the following table for more functions.

Move up Select one item in the right column. Click , and this item will be moved forward in the playlist.
Move down Select one item in the right column. Click , and this item will be moved backward in the playlist.
Delete If you want to remove files from the Selected Files in the right column, please select files and click . Then those files will be removed from the right column, but will still be kept in the Media Folder. - Click
 and you will go back to the main page of Media Files. All selected files and folders will be listed in the table. There is an icon in front of each file name. The system helps you verify video files and see if they are playable in the SMP player. The meaning of each icon is listed in the following table. You can also click the icon to check detailed information of each file. Items with compatibility issues will be marked in red color.

The codec and bitrate of this video file are supported. 
This is a warning icon. For example, the bitrate might be too high. 
The codec of this video file is not supported. Please replace the file.
There are more options for you to customize your playback mode.
|
You have three options: Auto, 4:3, and 16:9. | ||||||
|---|---|---|---|---|---|---|---|
|
|
||||||
| Playback sequence |
|
||||||
|
If you need to remove any file from the playlist, you can click Edit Playlist to re-edit your playlist. You can also click the |
Note |
|
|---|---|
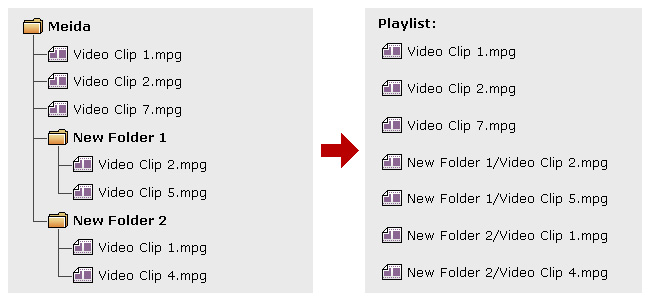
The playlist is the order how all multimedia files in the folder media are played. If you do not edit your own playlist, SMP will play all files in the Media Folder in the alphabetical order. If you create sub-folders under the folder media, all media files in these sub-folders will also be added together to the playlist according to the following sorting rules: (the former rules have higher priority than the later ones)
|
Network Streaming
There are four types of network streaming methods:
- RTB Client (Real-Time Broadcast)
RTB Client only works with CAYIN CMS's RTB Server function. SMP, incorporating with a CMS server, can play streaming video. To play streaming video as RTB client, select the channel corresponding to the client's server, i.e. CMS server. Select the broadcast mode for the source. You can select the display ratio (4:3 or 16:9) from the drop-down menu here. - RTP (Realtime Transport Protocol)
You can use RTP compliant software sending RTP streaming to SMP, e.g. VideoLAN client/server (http://www.videolan.org). To play RTP streaming, enter the port number of the relevant RTP server. Select the broadcast mode for the source. You can select the display ratio (4:3 or 16:9) from the drop-down menu here. - RTSP Streaming (Real Time Streaming Protocol)
To play video file over RTSP, enter the URL of the file in this option. You can also select the display ratio (4:3 or 16:9) from the drop-down menu here. - HTTP/MMS Streaming
To play video file via HTTP or MMS streaming, e.g. video file on a web server or MMS server, enter the URL of the file in this option. You can also select the display ratio (4:3 or 16:9) from the drop-down menu here.
Video Input
To play AV-IN signal on the multimedia area, please select this item, and set the display ratio as 4:3 or 16:9. You can configure more related settings on SYSTEM > Peripheral > Video In page.
Central Scheduling
If you enable this function, the content playback of this zone will be centrally managed by a CMS server. Please refer to the section SCHEDULE in CMS server for further settings.
Face Detection
You can use the face-detection function to convey specific messages to target customers. This designated content will be shown within the video zone. SMP will resume playing original contents which you set in this page once the termination condition is met.
Note |
|---|
If you would like to play the face-detection content in full screen rather than in a video zone, please go to PLAYBACK > Face Detection page for all related configurations. |
- Click the face detection icon,
 ; then, go to Face Detection setting page.
 - Enable the service and select a camera in the drop-down menu. If you cannot see any camera in the list, it means that you have not added any camera. Please go to PLAYBACK > Face Detection page to add a webcam.
- Click Save. Then, you should be able to see its webcam preview on the right-hand side.
- Click
 to add one trigger criterion and its corresponding playback contents.
 - Set detection criteria. There are three kinds of criteria: People (number of people), Gender, and Age. Gender and age can be combined as one criterion. However, you cannot set either gender or age at the same time if you choose the number of people as your detection criterion.
Note
You should enable the gender or age detection when you create a task in QVR Face Tiger, otherwise SMP cannot retrieve any detection data even though you set gender or age as your trigger criterion on SMP’s Web Manger.
- Edit playback content. You can click the Edit Playlist button to create a video playlist directly on this page.
- Set a termination condition to decide when the above content should be stopped playing.
- The video(s) end.
- You can set a playback duration to specify a time limit.
- The detection result does not match the criteria anymore.
- Nobody is watching the camera.
- Click Save to complete setting. Then, you will see this item listed in the Detection table.
- Click Close and go back to the Video zone setting page. Then, you will see the face detection icon turns purple
 .
.
Image Zone 
If there are two image zones on your selected skin, you have to configure settings for both two zones: Image-1 and Image-2.
Media Files
You can choose to play image files in this SMP's Media Folder.
- Click Edit Playlist, and you can select those image files you want to play. All files in the Media Folder will be listed in the left column. You can click the refresh button to make sure the system gets the most updated data. If the left column is empty, that means there is no file in the Media Folder. Please add image files to Media Folder first.
- Select those files you want to play. You can select multiple files at one time by holding the Shift or Ctrl key, or just select files one by one. You can also choose a folder and play all files in that folder. If you want to search any specific file, enter the keyword after the search icon . Then all possible files and folders will show up.
- Click , and all selected files in the left column will be duplicated to the right column. SMP will only play those files in the right column.
- Now, you can arrange the order of those selected files. In the right column, SMP will play files from top to bottom. Please refer to the following table for more functions.
Move up Select one item in the right column. Click , and this item will be moved forward in the playlist.Move down Select one item in the right column. Click , and this item will be moved backward in the playlist.Delete If you want to remove files from the Selected Files in the right column, please select files and click . Then those files will be removed from the right column, but will still be kept in the Media Folder. - Click and you will go back to the main page of Media Files. All selected files and folders will be listed in the table. There is a magnifying glass icon in front of each file name. You can click the icon to see a larger picture.
There are more options for you to customize your playback mode.
| Duration | Set the Duration in seconds for playing each picture. | ||||||||||||||||
|---|---|---|---|---|---|---|---|---|---|---|---|---|---|---|---|---|---|
|
You can choose one transition effect here to make the transition more visually compelling. For the image zone which is larger than 4K resolution, you can only use the following transition effects:
|
||||||||||||||||
|
You can decide if you want to resize the images.
|
||||||||||||||||
|
|
||||||||||||||||
|
If you need to remove any file from the playlist, you can click Edit Playlist to re-edit your playlist. You can also click the |
Note |
|
|---|---|
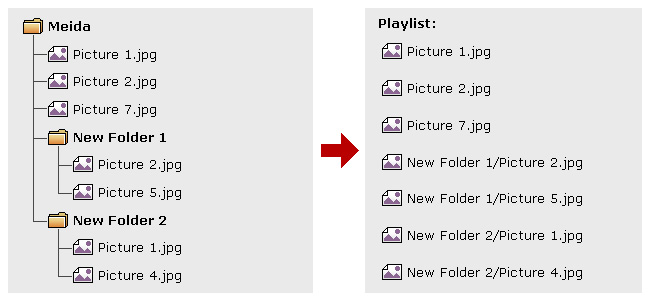
The playlist is the order how all multimedia files in the folder media are played. If you do not edit your own playlist, SMP will play all files in the Media Folder in the alphabetical order. If you create sub-folders under the folder media, all media files in these sub-folders will also be added together to the playlist according to the following sorting rules: (the former rules have higher priority than the later ones)
|
Central Scheduling
If you enable this function, the content playback of this zone will be centrally managed by a CMS server. Please refer to the section SCHEDULE in CMS server for further settings.
Ticker Zone 
If there are two ticker zones on your selected skin, you have to configure settings for both two zones: Ticker-1 and Ticker-2.
Local Setting
There are three ways for you to input ticker texts:
- Enter text here
You can enter a text message, such as "Welcome to CAYIN Technology!". Save the settings and the text will be displayed on the screen.NoteYou can enter a maximum of 512 characters in the text field.
- Text file in Media Folder
You can type your message in a text file and save the file in Media Folder. When you enable this option, click Add/Edit to select the text files you want to play, and save the settings. The message in the text file will be displayed.
SMP supports UTF-8 character encoding. If the content is not written in English, please choose encoding type UTF-8 when you save the text file.NoteAll text files (.txt) can include totally a maximum of 16384 characters.
- Text from remote URL/RSS/ATOM
To show a text message available on a URL, click Add/Edit to enter the URL address in the option, e.g. http://your_server/message.txt. If you use the server side script to generate the dynamic text, we suggest you only send the text result (mime type txt/ plain) back to the SMP player. You can also retrieve live RSS messages. Enter the URL address in the option, e.g. http://rss.cnn.com/rss/cnn_us.rss.
NoteSMP players checks RSS feed every 20 seconds and updates if necessary. The format of non-English RSS link should be in the UTF-8 character encoding.
You can also customize the way the text appears. Here are some attributes:
|
You can select a font face |
||||||||||||||||||
|---|---|---|---|---|---|---|---|---|---|---|---|---|---|---|---|---|---|---|---|
|
You can change the direction of the text from Left to right |
||||||||||||||||||
|
You can set the color of the text There are three ways for you to choose a color. You can enter the R, G, B numbers or the color code directly. You can also use the color picker tool to choose a suitable color. The system provides the color preview on the right-hand side so that you can select the best matching color combination for your ticker texts and background. |
||||||||||||||||||
|
|
||||||||||||||||||
|
|
||||||||||||||||||
|
Set a suitable speed. 1 represents the slowest speed, and 6 represents the fastest one. |
Central Scheduling
If you enable this function, the content playback of this zone will be centrally managed by a CMS server. Please refer to the section SCHEDULE in CMS server for further settings.
HTML/Flash Zone 
If there are more than one HTML/Flash zones on your selected skin, you have to configure settings for each of them: HTML/Flash-1, HTML/Flash-2 and HTML/Flash-3.
File
You can choose one .html or .swf file you want to playback in the drop-down menu. You need to upload files into SMP's Media Folder in advance or you won't see any file in the drop-down menu.
The system also provides more functions for you to show only some part of the HTML/SWF file or add any parameter.
- Web page capture
Please enable Web page capture if you want to show only some part of the HTML/SWF file.
- Enable the function, and you will see the following information:
Content (W, H) It means the real size (resolution) of the web page. Drag (X, Y) It means location of the start point (upper-left point) of the captured area. -
Click Capture; then you can see the web page and start to define the area you want to show. Remember to click Reload every time you enter a new number in the following fields, so that you can see the updated captured area on the preview picture.
Content (W, H) Enter the real size (resolution) of the web page. Drag (X, Y) Enter the location of the start point (upper-left point) of the captured area. You can also drag the captured area directly on the preview picture. Drag (W, H) Enter the size of the captured area in the tool bar. You can't drag directly on the preview picture. NoteThe real presentation of the captured HTML is restricted to the size of the HTML zone on your selected skin. For example, if the HTML zone on the skin is 400x300 resolutions, you can only show content with 400x300 resolutions even though you might capture 800x600.
- You can click Preview to check the real presentation and click OK to finish settings.
- Enable the function, and you will see the following information:
- Enable extra parameters
Click Enable extra parameters and fill in required fields if you only want to add any extra parameter.
URL
You can show one .html or .swf file from a remote URL. Please enter the URL address here.
The system also provides the following two functions:
- Web page capture: let you show only part of the web page.
- Enable extra parameters: fill in required fields to add extra parameters.
xPost
- Enter the hostname or IP address of the xPost server.
- Click Connect to establish the connection.
- Enter the username and password of xPost.
- You will see all available options in the right column after successful login.
- Choose a module and a display name. You can click Preview to see the real-time preview of the display.
You can include CAYIN xPost content in the HTML zone.
IMPORTANT |
|---|
CAYIN provides this free editing tool for you to show Twitter information on your screen easily via CAYIN's SMP players. CAYIN does not save the data and all data come directly from Twitter. Therefore, the SMP player which connects to Twitter must be online all the time and has a stable broadband network connection. |
- Enter your Twitter ID in the User field.
- Select a template. We provide some basic templates with different colors for you to choose from. Select one and you can see the preview image. You can still modify the layout later in Advanced settings area.
- Enter a title and subject of Twitter timeline.
- Customize your own timeline layout in Advanced settings area.
Border radius 
You can change the border radius of the timeline. If you set 0, it will become a rectangle. Select a number and the system will generate a preview image for you. Background color 

Shell: You can change the color of the shell by the color picker tool. Tweets: You can change the color of the texts. Pick a color and the system will generate a preview image for you. Separator color 

Header: You can change the color of the line below the subject. Tweets: You can change the color of the lines between tweets.
Pick a color and the system will generate a preview image for you.Text color 


Header: You can change the color of the title and the subject. Tweets: You can change the color of the tweets. Link: You can change the color of the link text.
Pick a color and the system will generate a preview image for you.Font style 
You can change the font face here. The system won't generate a preview image for font style. Font size 
You can change the font size here. The system won't generate a preview image for font size. Avatars 
You can choose to show or hide avatars. Click the button and the system will generate a preview image for you.
Weather
IMPORTANT |
|---|
CAYIN Weather Server provides this free service for you to show weather information on your screen easily via CAYIN's SMP players. The SMP player which connects to CAYIN Weather Server must be online all the time and has a stable broadband network connection. |
- Select a city list. CAYIN now provides the following city lists for free use.
City List Display Language Cities 15 major cities of the world English London, New York, Chicago, Dubai, Hong Kong, Paris, Shanghai, Singapore, Sydney, Tokyo, Buenos Aires, Madrid, Toronto, Frankfurt, Mexico City Major cities in Taiwan Chinese 台北, 桃園, 新竹, 苗栗, 台中, 彰化, 嘉義, 台南, 高雄, 屏東, 花蓮, 台東, 基隆, 金門, 澎湖 Major cities in the USA English Los Angeles, New York, Chicago, Houston, Philadelphia, Phoenix, San Antonio, San Diego, Dallas, San Jose, Jacksonville, Indianapolis, San Francisco, Austin, Columbus Major cities in the Middle-East English Dubai, Beirut, Istanbul, Riyadh, Doha, Muscat, Abu Dhabi, Amman, Kuwait, Cairo Major cities in Thailand Thai กรุงเทพมหานคร, นนทบุรี, นครราชสีมา, เชียงใหม่, หาดใหญ่, อุดรธานี, ขอนแก่น, อุบลราชธานี, นครศรีธรรมราช, นครปฐม Major cities in China Simplified Chinese 上海, 北京, 天津, 广州, 武汉, 成都, 重庆, 南京, 香港, 西安, 沈阳, 杭州, 哈尔滨 Major cities in Spain English Barcelona, Madrid, Granada, Seville, Bilbao, Valencia, Cordova, San Sebastian, Salamanca Major cities in the UK English London, Birmingham, Leeds, Glasgow, Sheffield, Bradford, Liverpool, Edinburgh, Manchester, Bristol Major cities in Australia English Sydney, Melbourne, Brisbane, Perth, Adelaide, Gold Coast, Tweed Heads Major cities in Japan Japanese 東京, 横浜市, 大阪市, 名古屋市, 札幌市, 神戸市, 京都市, 福岡市, 川崎市, さいたま市, 広島市 Major cities in Malaysia English Kuala Lumpur, Johor Bahru, Ipoh, Shah Alam, Petaling Jaya, Kuching, Kota Kinabalu Major cities in Philippines English/Tagalog Lungsod Quezon, Maynilà, Caloocan, Dabaw, Lungsod ng Cebu, Zamboanga City, Antipolo, Pasig, Taguig, Cagayan de Oro Major cities in Russia Russian Москва, Санкт-Петербург, Новосибирск, Екатеринбург, Нижний Новгород, Самара, Омск, Казань, Челябинск, Ростов-на-Дону Major cities in Brazil Portuguese São Paulo, Rio de Janeiro, Salvador, Brasília, Fortaleza, Belo Horizonte, Manaus, Curitiba, Recife, Porto Alegre, Belém, Goiânia Major cities in Colombia Spanish Bogotá, Cali, Barranquilla, Cartagena, Cúcuta, Bucaramanga, Soledad Major cities in Saudi Arabia Arabic الرياض, جدة, مكة, اَلْمَدِينَة اَلْمَنَوَّرَة, الطائف, الدمام, خـميــس مشيـــط, بريدة, الخبر, الجبيل Major cities in Lebanon English Beirut, Tripoli, Zahlé, Jounieh Major cities in El Salvador Spanish San Salvador, Soyapango, Santa Ana, San Miguel, Mejicanos Major cities in Indonesia Indonesian Jakarta, Surabaya, Bandung, Medan, Semarang, Palembang, Makassar, Batam, Pekanbaru, Bandar Lampung, Padang, Denpasar, Samarinda - If you have a customized city list, please select Enter Customized ID in the drop-down menu. Then enter your Customized ID and click OK. Please contact CAYIN's salespeople for tailored ID of City List if you want to customize your own city list.
- Customize your own layout in Advanced settings area.
Size of area 
There are five fixed sizes of the weather information area: 250 (w) x 75 (h), 285 (w) x 170 (h), 550 (w) x 320 (h), 760 (w) x 500 (h), and 1000 (w) x 650 (h). We suggest you create an HTML area with the same size, or the weather information will be aligned with the upper left corner. Color 

Background color: You can change the background color of weather zone by the color picker tool. If you want to have a transparent background, please enable the function: Disabling single color background. Text color: You can change the color of the texts. Pick a color and the system will generate a preview image for you. Effect 
No Effect: 
There's no transition effect. Bottom Up: 
There's an transition effect. Unit 
Celsius: 
You can display the temperature in Celsius. Fahrenheit: 
You can display the temperature in Fahrenheit.
Pick a unit and the system will generate a preview image for you.Pause time You can set the pause time between cities. The range is from 3 to 1024 seconds. Icon type There are two types of icons: 
Pick an icon and the system will generate a preview image for you.
HTML Code
If you want to embed codes provided by other websites, e.g. Twitter, please enter the codes here. You can enter a maximum of 2048 characters.
QR Code
Select a QR code and it will be shown in the HTML zone. If you do not see any QR code here, please add or upload one in Library-QR Code page.
Central Scheduling
If you enable this function, the content playback of this zone will be centrally managed by a CMS server. Please refer to the section SCHEDULE in CMS server for further settings.
Central Scheduling
 |
If you want to let CMS server control the Program playback of the SMP player, please click the option: Central Scheduling. Central scheduling for a SMP player applies only one server configuration. Please remember to complete the server settings in CMS page before you start to use the function.
Back to TopPreview the Presentation
After you create a Program, you can preview the presentation before you start to play. Simulation is for reference only. Actual display may differ.
 |
- Click the icon of the magnifier beneath the Program. Then you can see the preview page of that Program.
- At the left-hand side of the preview page, there will be the playback simulator. You can see the playback of image, html/swf, and ticker based on your settings of each zone. You won't be able to see the playback of video (except H.264 video) and clock zones.
- At the right-hand side of the preview page, there will be detailed information of each zone on this skin.
Start to Play
 |
After you create a Program and check the preview, you can click the play button beneath your selected Program. Then the SMP player will start to play multimedia contents based on the Program settings.
Back to Top