Client Settings
In this section, we will show you how you can install CMS-WS Player on your device and establish connection to a CMS-WS server.
Note |
|---|
Please note that smooth playback depends on your player's hardware specifications. |
CMS-WS Player: Web Extension
You can install CAYIN’s free browser extension on your device and turn it into a digital signage player. We use Chrome as an example to explain the installation procedure.
Install from Chrome Web Store
- Go to the Chrome Web Store.
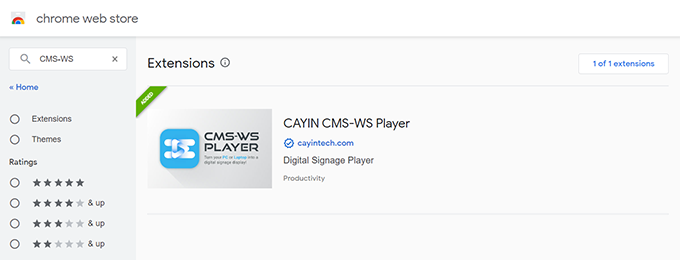
- Use CMS-WS as the keyword to search.
- Click CMS-WS Player and enter the product introduction page.
- Click Add to Chrome button.
Install the Web Extension Manually
- Download CMS-WS Player (Web Extension) from CAYIN’s website.
- Unzip the downloaded zip file, i.e.: CAYIN CMS-WS Player-extension.zip
- Open Google Chrome browser.
- Click
 in the upper right corner of Chrome browser.
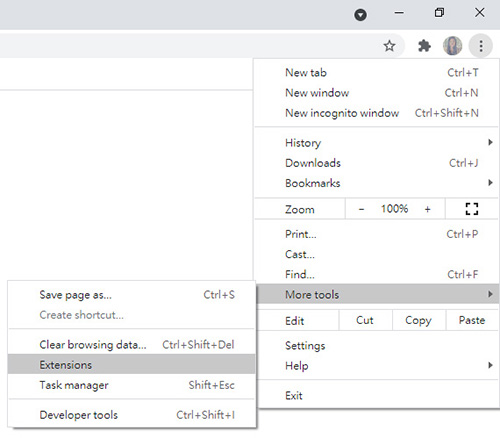
- Select More tools > Extensions.
- Turn on Developer mode.

- Click Load unpacked and select the folder you just unzipped in step 2.
- The extension software will be installed instantly.

- Turn off Developer mode (optional).
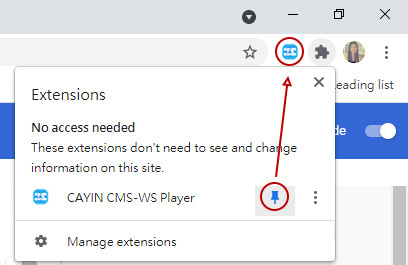
- Click on the Extension button
 in the toolbar. A drop-down menu will show you all the installed extensions.
 - Click on the pushpin icon to pin CMS-WS Player extension in the toolbar.
- Click CMS-WS Player’s icon
 in the toolbar.
 - Select CMS-WS as the model name.
- Fill in the settings of the player.
- Protocol://IP:Port: Copy the URL from CMS-WS server. Please refer to Copy Playback URL for detailed instructions.
- Enter the username and password to access the CMS server.
- Enter the host name and group which this playback device belongs to.
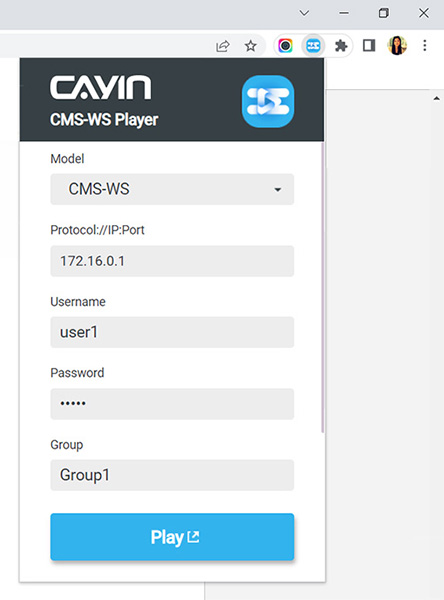
- Click on the Play button and the media player will start to connect to the CMS-WS server and receive streaming signals to play accordingly.
- Go to Google Play on your device.
- Use CMS-WS Player as the keyword to find the app in the top search bar.
- Click the Install button. Then, the system will start to install the app automatically.
- Click Open and start to use the App.
- Click Setting to assign a pin code.
- If you want to modify your pin code, click
 in the upper right corner.
 - Tap Playback on the Setting page.
- Select CMS-WS as the model name.
- Select HTTP or HTTPS as your communication protocol.
- Enter an IP address. Copy the URL from CMS-WS server. Please refer to Copy Playback URL for detailed instructions.
- Enter the username and password to access the CMS server.
- Enter the host name and group which this playback device belongs to.
- Click Save & Test button to verify connection.
- Click < on the top bar and click on the Playback button and the media player will start to receive streaming signals and play accordingly.
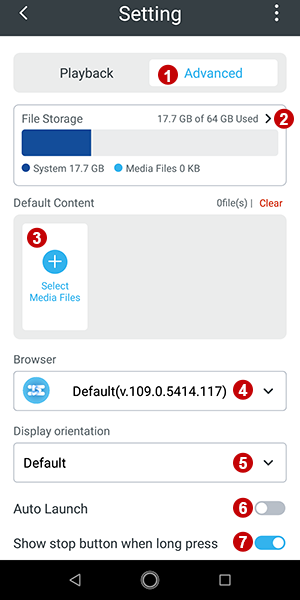
- Tap Advanced on the Setting page.
- Set the default playback content. When CMS-WS Player disconnects a server, the player will play the default content you set here. The player will switch back to the playback streaming from the server when the connection resumes. Tap + and select a media file.
CMS-WS Player (Android 10/11/12) supports the following formats:- Video: MP4 (H.264)
- Image: jpg, gif, png, bmp, webp, heif
- The image or video file will be added into the default playback list. You can repeat step 2 to add more files.
- Set a browser. You can use the default browser in most cases. However, if your device uses older version of Android like Android 6, you might come across some issues while playing videos. At this point, you can try to use another browser on your device.
- Set the display orientation. You can choose to rotate 90 degrees (left), 90 degrees (right), or 180 degrees.
- You can enable auto launch. The device will start playing automatically whenever the device is turned on.
- Use TV File or File Manager as the keyword to search on the Play store of your Smart TV.
- Install TV File Manager.
- Open CMS-WS Player and enter the Advanced page under Setting.
- Set the default playback content. When CMS-WS Player disconnects a server, the player will play the default content you set here. The player will switch back to the playback streaming from the server when the connection resumes. Tap + and select a media file, using AnExplorer.
- Select files on the local device or USB storage device via AnExplorer. Then, upload files to CMS-WS Player.
- Go to CAYIN’s website and download the software.
- Double click the file and follow the steps to complete installation.
- Execute the software and click Setting to assign a pin code.
- If your device connects to more than one screen, please select the screen you want to edit.
- Select Enable to activate the playback settings. If you do not want this screen to show any content, please select Disable.
- Select CMS-WS as the model name.
- Choose your browser type.
- Select HTTP or HTTPS as your communication protocol.
- Enter IP address. Copy the URL from CMS-WS Lite server. Please refer to Copy Playback URL for detailed instructions.
- Enter the username and password to access the CMS server.
- Enter the host name and group which this playback device belongs to.
- Set the default playback content. When CMS-WS Player disconnects a server, the player will play the default content you set here. The player will switch back to the playback streaming from the server when the connection resumes. Tap + and select a media file.
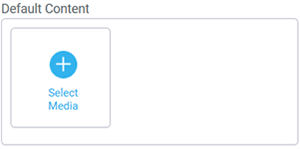
CMS-WS Player (Win 10) supports the following formats:
- Video: MP4 (H.264)
- Webm (VP8, VP9, AV-1)
- OGG (audio)
- Image: apng, gif, bmp, jpg, jpeg, jfif, png, svg, gif, avif, ico, webp
- You can repeat step 9 to add more files.
- Click Save & Test button to verify connection.
- If you want to modify your pin code or change your display language, click
 in the upper right corner.
 - Click < on the top bar and click on the Playback button and the media player will start to receive streaming signals and play accordingly.
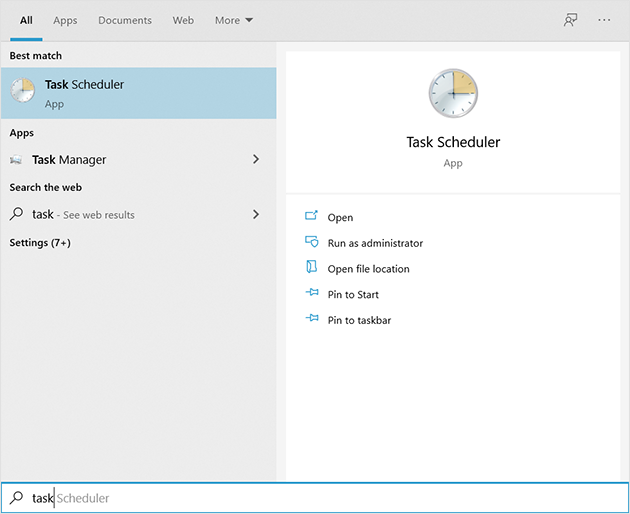
- Type Task Scheduler in the search field to find the program and click it to execute it.
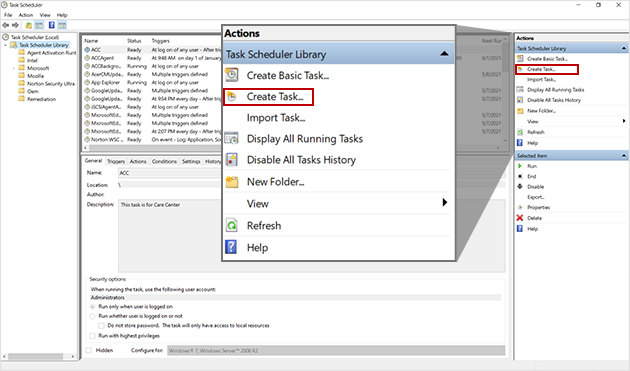
- Choose Create Task.
- Set General settings.
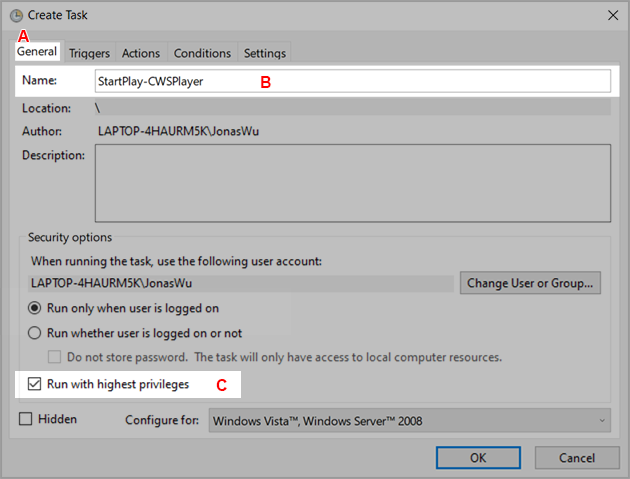
- Click General.
- Enter a task name.
- Enable Run with highest privileges.
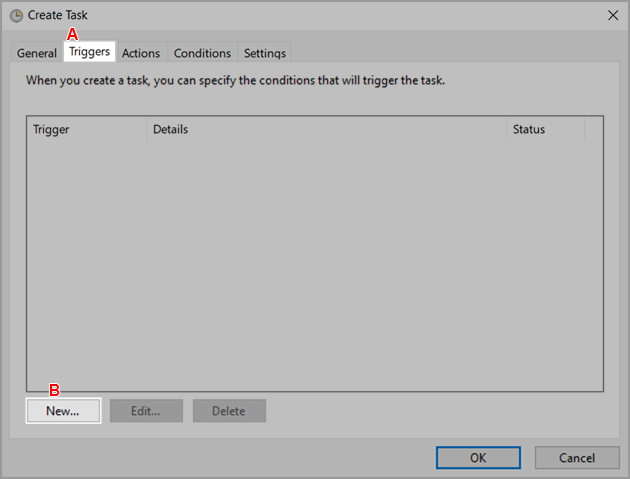
- Set Triggers.
- Click Triggers.
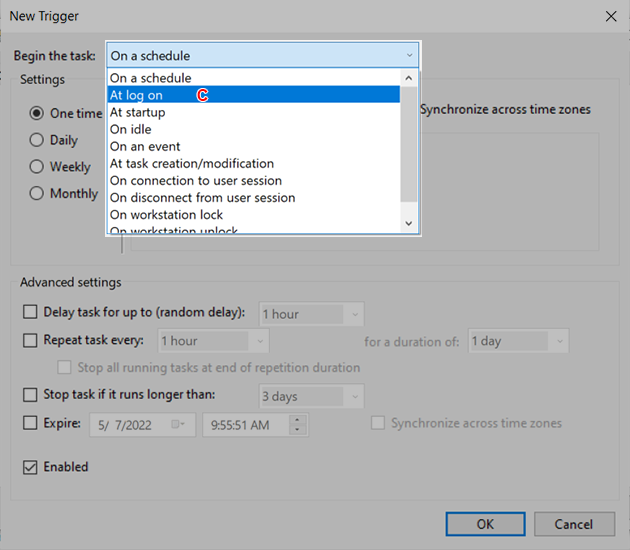
- Click New.
- Select At log on.
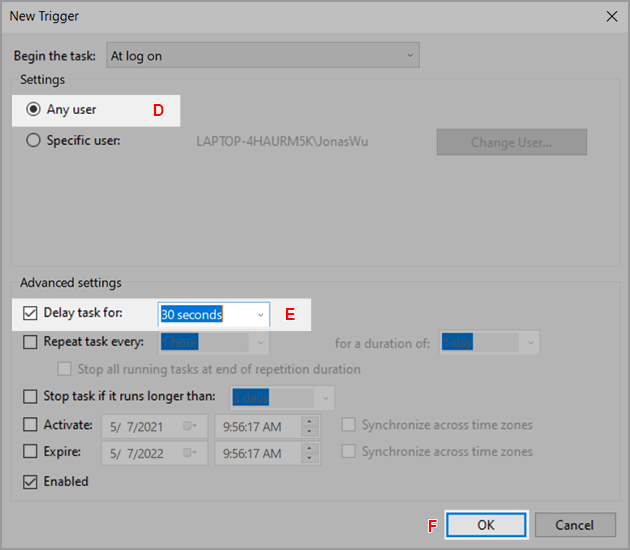
- Select Any user.
- Modify Delay task for 30 seconds.
- Click OK.
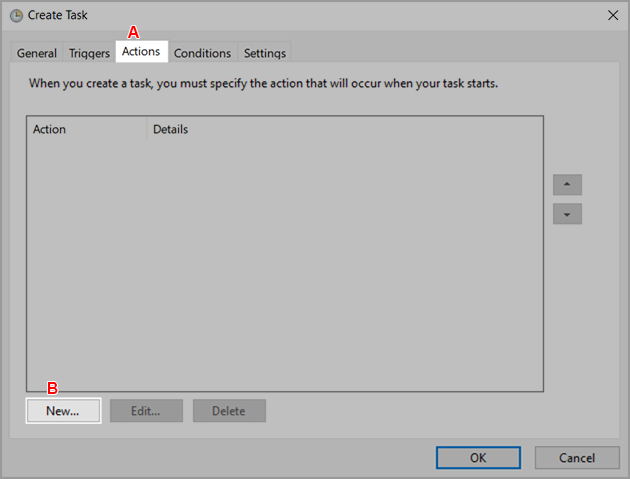
- Set Actions.
- Click Actions.
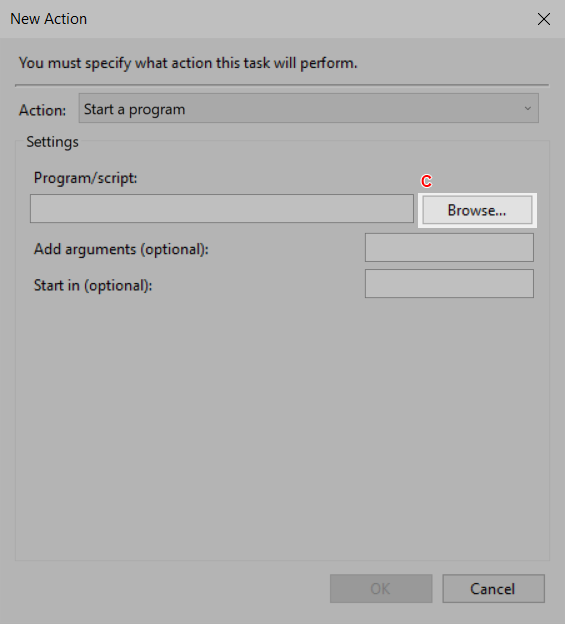
- Click New.
- Click Browse.
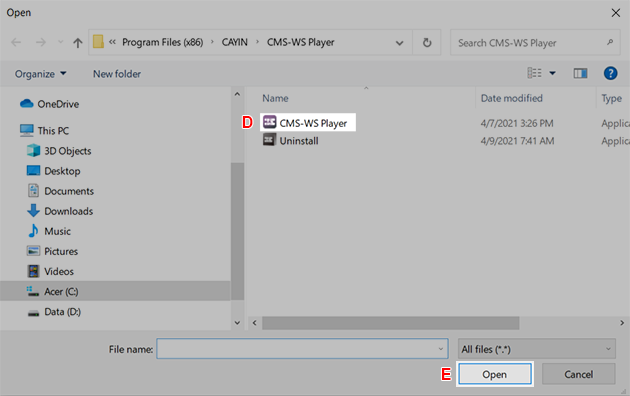
- Select the program.
- Click Open.
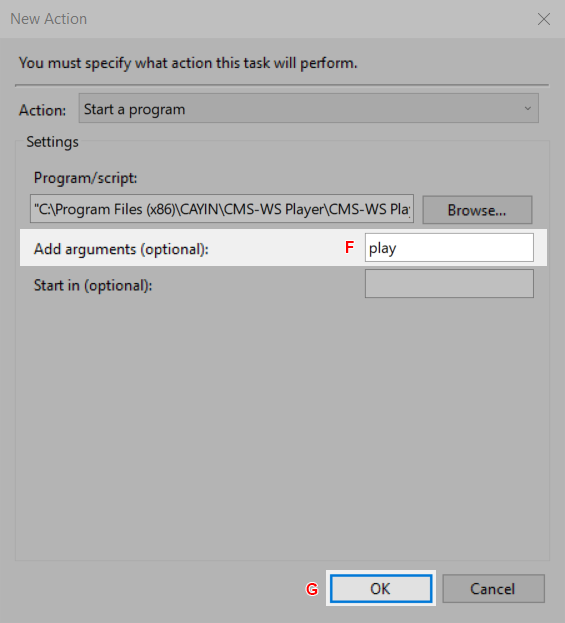
- Enter the parameter play.
- Click OK.
- Settings.
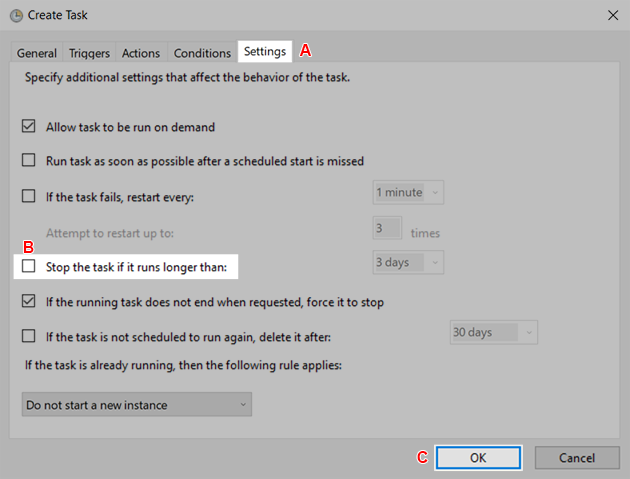
- Click Settings.
- Disable the function: Stop the task if it runs longer than.
- Click OK.
- Complete Settings.
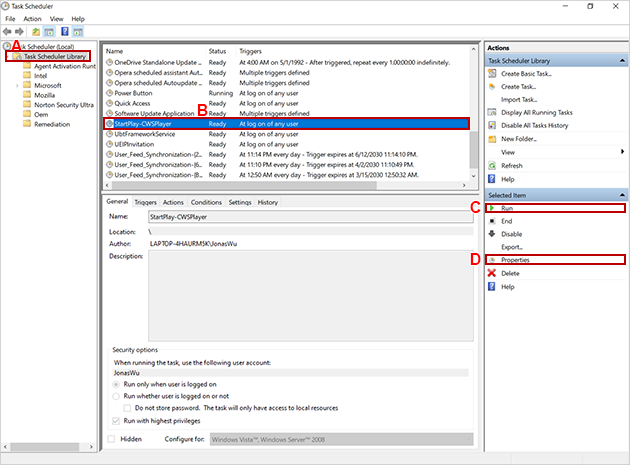
- Select Task Scheduler Library.
- Make sure the configurations are correct and the status is Ready.
- If you want to execute the program immediately, please click Run.
- If you want to modify settings, please click Properties.
 Back to Top
Configure CMS-WS Player
Please follow the steps below to establish connection between the player and the server.
CMS-WS Player: Android App
You can install CAYIN’s free Android App on your mobile device from Google Play or upload the APK file by yourself.
Install from Google Play
Install APK manually
You can download the software from CAYIN’s website. The installation steps will vary depending on the device you use.
Please note that you must be equipped with knowledge and skills to install APK. If you do not know how to install APK, we strongly recommend you install the App from Google Play.
Playback Settings
Advanced Settings
 |
Note |
|---|
For the auto launch function on a mobile device or Smart TV, please test on your platform in advance. There might be different restrictions on app’s auto launch function on different platforms. |
Playback Settings on Smart TV
CMS-WS Player: Windows App
Install CMS-WS Player
You can download the software from CAYIN’s website and install it on Windows 7 or later.
Configure CMS-WS Player
Run CMS-WS Player Automatically
You can use Task Scheduler to run CMS-WS Player automatically whenever you log in Windows.
Note |
|---|
You need to install CMS-WS Player in advance before you can set Task Scheduler. |