Playback Schedule
You can use the central scheduling function to manage a player's multimedia playback through CAYIN's CMS server.
Note |
|---|
Please note that smooth playback depends on your player's hardware specifications. |
- Introduction of User Interface
- Copy Playback URL
- Add New Scheduled Tasks
- Manage Existing Schedules
- Export/Import Schedules
Introduction of User Interface
Main Functions
 |
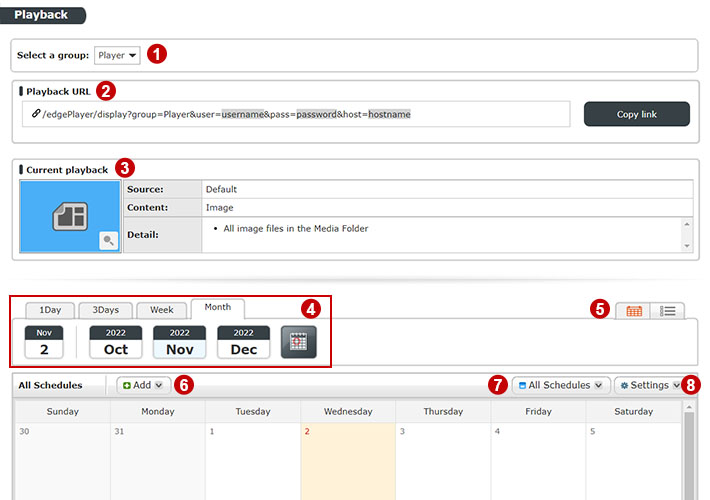
| 1 | Select a group: Please select a group to further configure Central Schedule. |
|---|---|
| 2 | Playback URL: You need to copy a group’s URL and paste it to the player’s setting page. |
| 3 | Current Playback: It shows the source and type of current playback, as well as the name and related configurations. Click the button |
| 4 | Views Menu (Period of Time). You can change the view mode and select a date or a time interval to manage your schedules. |
| 5 | Calendar/List Views. You can use either the calendar or time list to manage schedules. |
| 6 | Add a scheduled task. You can click this button to add scheduled tasks. |
| 7 | Schedule filters. You can use the filter to show a specific type of scheduled tasks. |
| 8 | More settings and functions. You can export/import/delete scheduled tasks. |
Calendar View
 |
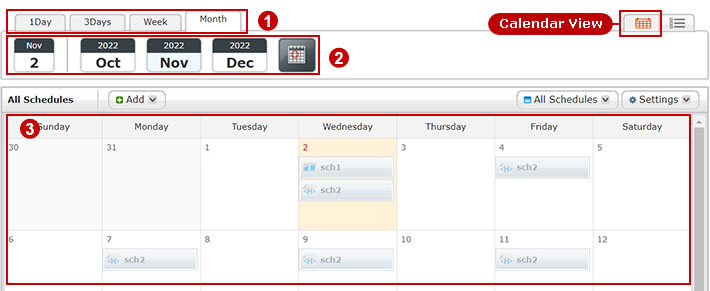
| 1 | You can choose to see the calendar in 1Day or set your own period. |
|---|---|
| 2 | You can choose to see schedules of a specific day, week, or month. This section includes three parts:
|
| 3 | After you set the date or the time period, you can see schedules here. Please note that the same task will be marked in yellow if you move your mouse over it. |
List View
 |
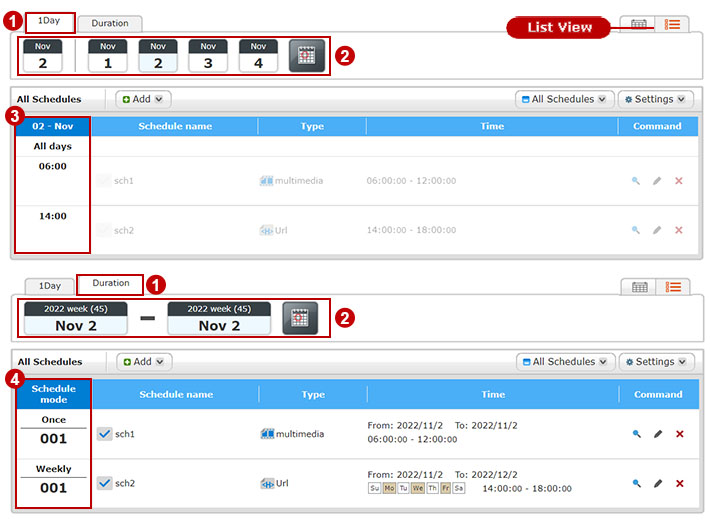
| 1 | You can choose to see schedules in 1Day or Duration view. |
|---|---|
| 2 | You can choose to see schedules of a specific date or time period. The system provides some shortcuts for you to select a date or time period quickly. You can also use the datepicker to select any specific dates you want. |
| 3 | In 1Day view, the first column will be the time of that specific date. Therefore, you can use the timeline to check schedules. |
| 4 | In Duration view, the first column will show the frequency of scheduled tasks. Therefore, you can check the total number of tasks based on the playback frequency (once, daily, weekly, monthly, yearly, location) during the specified period of time. |
Copy Playback URL
You need to copy a group’s URL and paste it to the player’s setting page. Players of the same group will play the same content.
- Select a group.
- Click Copy link. The link you copy includes four parameters: group name, username, password, and hostname. The group name will be included into the link automatically, but you need to edit the rest of the three parameters by yourself when you fill the link in a media player’s setting.
E.g.:
http://ip/edgePlayer/display?group=Player&user=username&pass=password&host=hostname
Note |
|---|
|
Add New Scheduled Tasks
 |
You can add scheduled tasks to playback different multimedia contents and sources (Program/Playlist/Video/Image/HTML) at designated time.
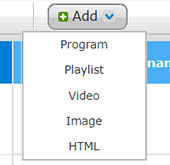
- Click Add and select a multimedia type (Program/Playlist/Video/Image/HTML) in the drop-down menu. Then you will go to the editing page.
- Fill in the Schedule Name.
- Select a Schedule Mode and specify the date and time.
Once Play this task only once.
- Period: Specify a start date and time and an end date and time.
Daily Play this task every day.
- Period: Select a date range that this task will be played.
- Time: Specify the start time and end time (hour, minute and second)
Weekly Play this task every week.
- Period: Select a date range that this task will be played.
- Week: Check those days of the week you want to execute this task.
- Time: Specify the start time and end time (hour, minute and second)
Monthly Play this task every month.
- Period: Select a date range that this task will be played.
- Week: Check the weeks and those days of the week you want to execute this task.
- Day: Select those dates you want to execute this task. If you want to play contents on the last day of each month, please set Countback settings: 1st day of a month.
- Time: Specify the start time and end time (hour, minute and second)
Yearly Play this task every year.
- Period: Select a date range that this task will be played.
- Month: Check those months you want to execute this task.
- Week: Check the weeks and those days of the week you want to execute this task.
- Day: Select those dates you want to execute this task. If you want to play contents on the last day of each month, please set Countback settings: 1st day of a month.
- Time: Specify the start time and end time (hour, minute and second)
- High priority: If you set two-layer groups and there is a conflict schedule between the parent group and the child group. The schedule of the child group has priority by default. That means during the conflict time, SMP player runs the schedule item in the child group. However, you can override this default behavior by enabling the “High priority” option in the parent group to make the parent group schedule prior to the child group schedule.
- Select a content which you want to apply to this task.
Program Select the Program you want to apply. You can select one from the existing programs or click Add new Program button on the upper right corner to create a new program. Playlist Select the Playlist you want to apply if you already create it in the LIBRARY page. You can also click Add new Playlist to create a new one for this scheduled task. Video Select the video source you want to apply and the player will play the full-screen video from the designated source. Image Select the image source you want to apply and the player will play the full-screen image slide show from the designated source. HTML Select the HTML source you want to apply and the player will play the full-screen HTML page from the designated source.If you want to use QR Code, please create it on the LIBRARY page in advance. - Click Save to create a scheduled task. Then you can see the scheduled task on the calendar or time list.
- Please remember to click the enable button (from
 to
to  ) to enable the scheduled task.
Default Schedule
You can add a Default Schedule and players will apply this default setting whenever no specific scheduled items are defined. Scroll down the Schedule page, find Default Schedule area, and click ![]() to edit a default schedule. Players will play all video files in the Media Folder by default.
to edit a default schedule. Players will play all video files in the Media Folder by default.
 |
Emergency Schedule
You can setup an emergency schedule item for a specific Group.
 |
- Enable "Emergency Schedule".
- Click
 to add a Schedule item.
Trigger Emergency Schedule
You can trigger the configured Emergency Schedule on CMS' UI. Find Emergency Schedule button in the right top corner of CMS' Web Manager.
 |
Manage Existing Schedules
Filter Schedule
You can use the schedule filters to show a specific type of scheduled tasks only in the calendar or list. CMS provides the following filters:
- All Schedules: show all scheduled tasks.
- Once: show those tasks which are scheduled to play only once.
- Daily: show those tasks which are scheduled to play every day.
- Weekly: show those tasks which are scheduled to play every week.
- Monthly: show those tasks which are scheduled to play every month.
- Yearly: show those tasks which are scheduled to play every year.
Preview Schedule
- You can see a magnifier icon
 for each scheduled task both in calendar and list view.
 - Click the Preview icon; then you will see a pop-up window with detailed information, which this task is scheduled to play. At the top of the preview page, there will be the playback simulator. You can see the playback of image, html, and ticker, but you will not be able to see the playback of video and clock. At the bottom of the preview page, there will be detailed information of the multimedia contents.
Edit Schedule
- You can see a pencil icon
 for each scheduled task both in calendar and list view.
 - Click the Edit icon; then you will enter the editing page and start to modify the schedule.
- After you complete editing, click Save to save the changes.
Delete Schedule
- You can see a trash can icon
 for each scheduled task both in calendar and list view.
 - Click the Delete icon; then you can delete the schedule.
- You can also click the Settings button and select Delete all to delete tasks all together.
Export/Import Schedules
You can export schedules, save them in your PC, and then import them to other CMS servers.
Export Schedule
Click Export and you can save schedules as a .sch file.
Import Schedule
Click Import, select a .sch file, and click Upload.
Back to Top