Display Information
In this section, you can configure the following settings related to the display.
Display Settings
Every product model supports a different maximum number of displays and applies different display settings. If your model doesn't support some functions, you will not see related settings on your management interface.
| Model | Max. Display Number | Display Mode | Playback Settings |
|---|---|---|---|
| SMP-2100 | 2 | Single, Clone, Extended, Distinct | Apply up to 2 different playback settings |
| SMP-2200 | 2 | Single, Clone, Extended, Distinct | Apply up to 2 different playback settings |
| SMP-2210 | 3 | Single, Clone, Extended, Distinct | Apply up to 3 different playback settings |
| SMP-2300 | 2 | Single, Clone, Extended, Distinct | Apply up to 2 different playback settings |
| SMP-2310 | 3 | Single, Clone, Extended, Distinct | Apply up to 3 different playback settings |
| SMP-6000 | 2 | Single, Clone, Extended, Distinct | Apply up to 2 different playback settings |
| SMP-8000 | 4 | Single, Clone, Extended, Distinct | Apply up to 2 different playback settings even for 3 and 4 screens |
| SMP-8000QD | 4 | Single, Clone, Extended, Distinct | Apply up to 4 different playback settings |
| SMP-8100 | 4 | Single, Clone, Extended, Distinct | Apply up to 4 different playback settings |
- Single Mode: Output signals to one single display only. You will have best overall system performance by choosing this method.

- Clone Mode: Connect one SMP player to two or more screens which present the same content

- Extended Mode: Connect one SMP player to two or more screens and present one content which will stretch across these screens.

- Distinct Mode: Connect one SMP player to two or more screens which present different contents on each screen. You need to configure playback settings for the second screen separately.

Note |
|---|
Screens with one identical model for Clone and Extended modes are strongly suggested. You can only configure one screen resolution for all these screens, so the presentation result may be unpredictable if you use screens of different models, one of which doesn't support the selected resolution. |
Please follow the steps below to complete screen settings.
- Go to SYSTEM > Display > Display settings.
- Choose a display mode: single, clone, distinct, or extended mode. When you move the mouse on the mode you want to choose, you will see more options of the screen orientation related to that mode.
- Choose a screen orientation which suits your case.
Single Mode:
Click the image representing the screen orientation you want.
Clone Mode:All SMP Players 
Click the image representing the screen orientation you want.
Extended Mode:SMP-2100, SMP-2200, SMP-2300, SMP-6000 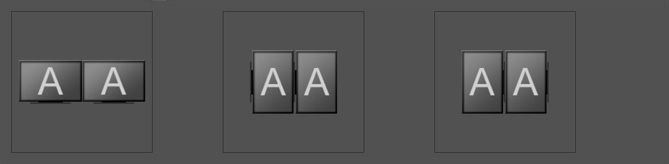
SMP-2210, 2310 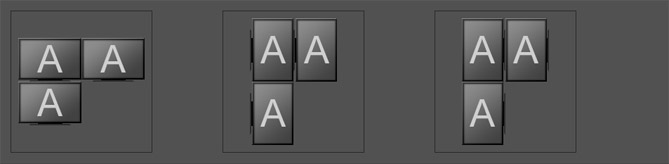
SMP-8000, SMP-8000QD, SMP-8100 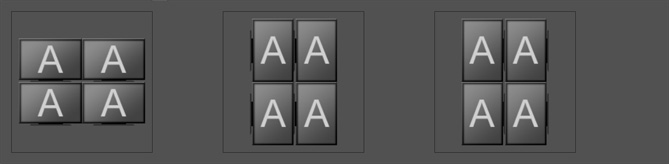
1 Select a screen array. 2 Click the image representing the screen orientation you want.
Distinct Mode:SMP-2100, SMP-2200, SMP-2300, SMP-6000 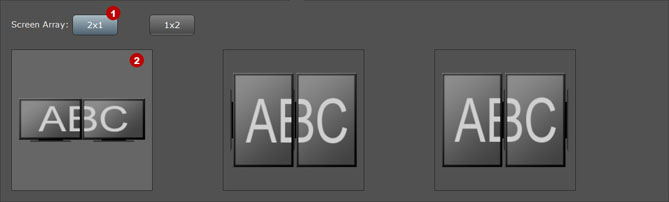
SMP-2210, 2310 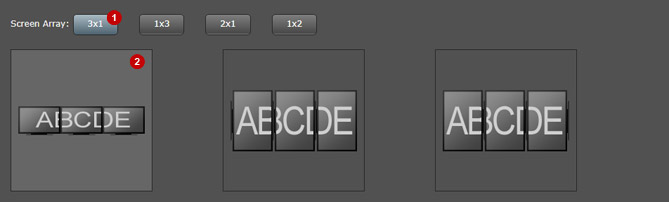
SMP-8000, SMP-8000QD, SMP-8100 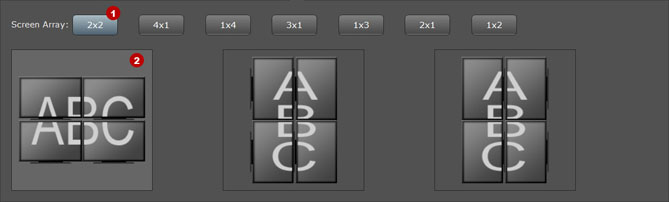
1 Decide which screen (or screens) you are going to configure. SMP-2100, SMP-2200, SMP-2300 and SMP-6000 support two sets of playback configurations. So, you will see 1 and 2 these two numbers here. Just click a number to configure each screen. For SMP-8000QD, the player can support up to four screens and each one of them can apply its own playback configurations, so you will see 1, 2, 3 and 4 these four numbers here. For SMP-8000, however, you can only see 1 and 2 these two numbers here, because the player can only support two sets of playback configurations, even though it can connect to four screens at the same time. 2 Select a screen array. For example, one SMP-2100 player can only connect to two screens. So, there is only one option, 1x1, for each screen. On the other hand, one SMP-8000QD player can support up to four screens. So, you can select 1x1 for each screen. Or, you can divide these four screens into 3 groups: screen 1 and screen 2 as 1x1 array, screen 3 as 2x1 array, and screen 4 as N/A.
3 Click the image representing the screen orientation you want. SMP-2100, SMP-2200, SMP-2300, SMP-6000 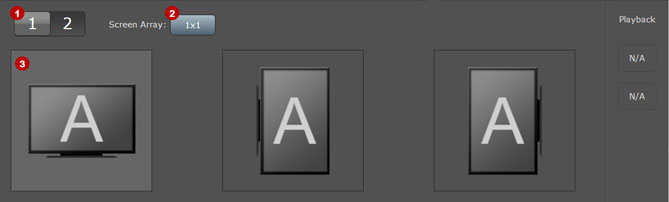
SMP-2210, 2310 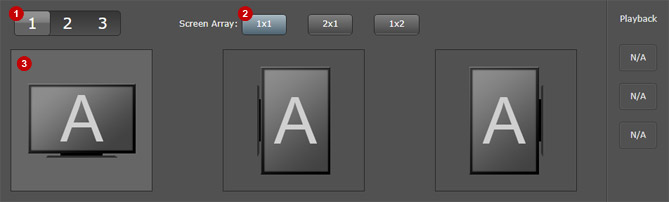
SMP-8000 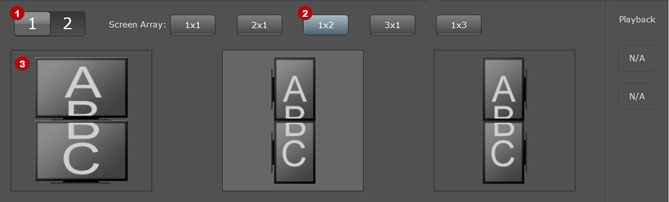
SMP-8000QD, SMP-8100 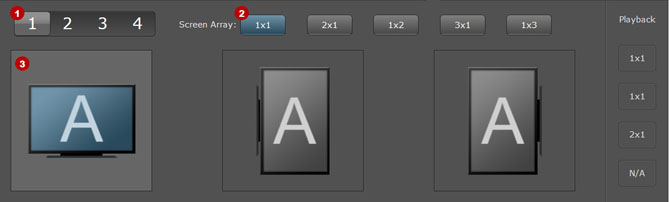
Repeat the procedure above to complete settings for each screen. Then, you will see screens with different colors in the Display settings area. Screens specified for the same color belong to the same circle and apply the same playback settings.
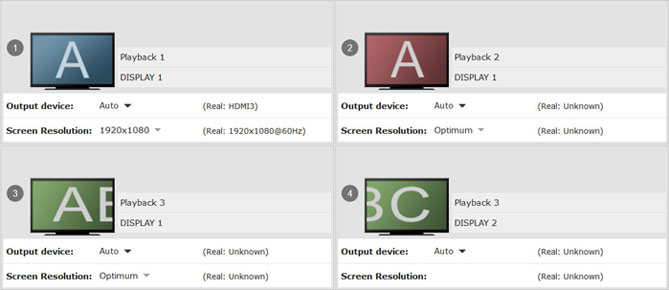
- Choose a video source (Output device). You can choose VGA/DVI/HDMI/DP directly. You can also choose AUTO and SMP player will detect connection automatically.
- Choose a screen resolution and refresh rate. Click the drop-down box and you will see two columns:
Recommended These resolutions are supported by the display's EDID (or DDC) standards. - Optimum: The system will choose an optimal resolution for you. If you don't see any resolution in this column, there might be two possible reasons:
- You must connect a screen to the player before you turn on the SMP player or you will not see any recommended screen resolution in the recommended column.
- Your display or VGA/DVI/HDMI cable might not support EDID signal. Please check with the manufacturer.
All Resolutions in this column are standards defined by VESA industry organization and represent all resolutions this SMP player can support. If you choose a resolution in this column, the presentation will be unpredictable. The result will depend on the screen you are using. - User define: You can enter your own specification by selecting this function. For Basic Configuration, you just need to enter a compatible resolution and refresh rate for your display. For Advanced Configuration, you must enter all necessary parameters, provided by your display vendor to drive the graphic output.
NoteSome display's refresh rate does not happen to be an integer (e.g. 59.9 Hz). You must check with your display vendor or try some numbers in the vicinity of that possible refresh rate.
We DO NOT guarantee any number you choose or enter in the User Define page can be compatible to your display. You must test the compatibility of your display before you use it. - Optimum: The system will choose an optimal resolution for you. If you don't see any resolution in this column, there might be two possible reasons:
The maximum or minimum settings of screen resolution will vary depending on your product model and display mode.
- SMP-2100, SMP-6000
Mode Single, Clone, Extended, Distinct Screen Resolution User Interface:
- Max. 1920x1440
User Define:
- Max. 2048 (width or height)
- Min. 320 (width or height)
- SMP-2200, 2210, 2300, 2310, 8100
Mode Single, Clone Extended, Distinct Screen Resolution User Interface:
- Max. 3840x2160@30Hz
User Define:
- Max. 4096 (width or height)
- Min. 320 (width or height)
User Interface:
- Max. 1920x1440
User Define:
- Max. 2048 (width or height)
- Min. 320 (width or height)
- SMP-8000 series
Mode Single Clone, Extended, Distinct Screen Resolution User Interface:
- Max. 3840x2160@30Hz
User Define:
- Max. 4096 (width or height)
- Min. 320 (width or height)
User Interface:
- Max. 1920x1440
User Define:
- Max. 2048 (width or height)
- Min. 320 (width or height)
Video resolution and specification may differ for different product models and output methods. Please refer to the video bitrate table for detailed specifications.
Back to Top
System Background Image
You can replace the system background image with your own image.
- Go to SYSTEM > Display > Display Settings.
- Choose the background image resolution according to your display standard.
- 16:9 or other widescreen resolutions: If you use 16:9 or 16:10 screen resolution, please upload your picture in this option.
- 4:3 or other resolutions: For 4:3 and other screen resolutions, please upload your image in this option.
NoteIf you are not sure about the display ratio, please upload both a wide (16:9) and a standard resolution (4:3) image here. System will apply the suitable one according to the screen setting.
- Click Upload and you will see a pop-up window.
- Click Browse…to locate the image you would like to upload and click Upload button to apply the change. Please upload the image with the same resolution as your screen resolution, so that the picture won't be resized, influencing the quality of your presentation.
- After you upload the image, you can see the resolution and the preview image here.
Screensaver
- Go to SYSTEM > Display > Display Settings.
- Click Edit in the Screensaver section. Then you will see a pop-up window.
- Tick Enable Screen Saver option to activate screensaver function. The system will automatically go into screen saver mode when the player idles for a period of time (such as 60 seconds).
- Select a media folder. Screen Saver will play video files located in the selected folder. You can also select to play a playlist.
- Click Save to complete the settings.
Cursor
You can choose to hide or show the mouse cursor on the screen.
- Show cursor: Click the Show button and you will see the icon
 .
. - Hide cursor: Click the Hide button and you will see the icon
 .
.
Display on/off
In SYSTEM > Display > Display on/off page, you can choose to turn on or turn off the screen remotely with SMP player (by cutting down the VGA signal). You can also schedule the time period during which you hope to turn off the screen to save energy.
Note |
|---|
Most screens will enter the sleep mode when the VGA signal is cut down by the SMP player. However, some screens might respond unexpectedly, such as showing a blue screen. The outcome depends on the firmware of each screen, not SMP player. |
Turn on/off the screen(s) immediately
- Click the button
 ; then the screen will be turned on instantly.
 - Click the button
 ; then the screen will be turned off instantly.
Turn off the screen(s) automatically during a specific period of time
- Click Edit to add a schedule if you want to turn on or off displays automatically based on schedules.
- After you click Edit, you will link to SCHEDULE > Screen On/Off page to edit a schedule. After you complete settings there, the information will be also shown on SYSTEM > Display > Display on/off page.
- Click Add a schedule and you will see a pop-up window.
- Fill in a schedule name and set the days and the period of time you want to turn off the screen; then click Save.
- You can add up to 10 schedules. Just repeat the same procedures to add more schedules.